Building a Car Camera Mount
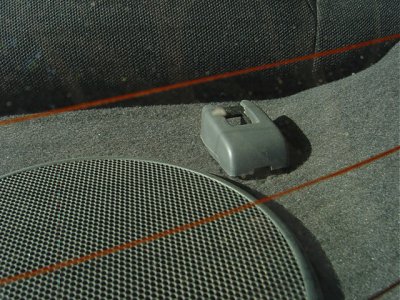
Ever since I have had my car on the racetrack, I have had wanted to construct a camera and camcorder mount for my car. The camera mount would allow me to mount a video camera or a still camera so that I can capture my driving experience for later analysis or for art. At the driving events, any loose objects must be removed from the car. Therefore cameras must be rigidly mounted to the car itself. My car happens to be a performance sedan with a rear deck. The rear deck has three brackets for mounting child safety seat. If I mount the camera to one of these mount bracket locations, I would not have to do any permanent modifications to my vehicle.
All of the parts I used, except the ball head, can be purchased at the local home improvement store. The total parts (without ball head) cost no more than five dollars. The micro ball head was the most expensive part out of the entire rig. If you have a flat rear deck, you may be able to forgo the ball head and use a machine screw, a nut, a washer, and a wing-nut instead. My rear deck slopes down towards the front, so I had to use a ball head for flexibility.
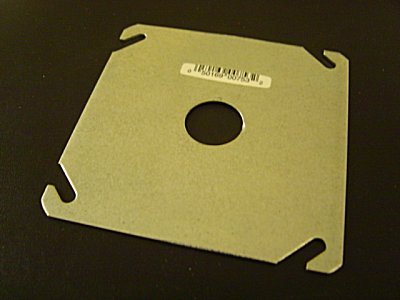
One of the parts I purchased was a metal electrical plate. This plate will be mounted to the car. The ball head and various future rigs can then be mounted to this plate. The large flat plate allows for custom configuration of the rigs.
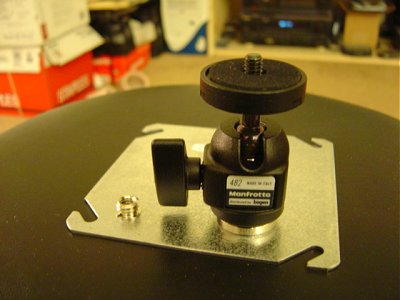
Since the rear deck of my car slopes downward, I decided to purchase a Bogen-Manfrotto Micro Ball Head #482. This micro ball head comes with a oversized ratchet lever to easy locking of the head. It also has two grooves for ninety-degree tilt; most mini ball head only has one. It is also possible to use a full-size ball head. But the camera equipment I wanted to use are light, so the micro ball head is sufficient.
After visiting the home improvement store with the micro ball head, I found that the camera tripod screw hole is 1/4"-20, but the ball-head tripod screw hole is 3/8"-16. The Bogen-Manfrotto Micro Ball Head #482 came with a conversion screw, as shown on the left in the picture above. However, I decided to be safe and purchased 3/8"-16 screws to secure the ball head.

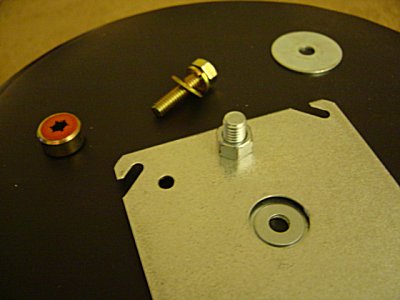
The picture above shows all of the hardware I purchased at the store. The gold screw bolt set on the left side is the hardware that ties down the child safety bracket. We will reuse this set of hardware and the three washers to secure the electrical plate to the vehicle. The bolt and nut in the middle is 3/8"-16 and will be used to secure the ball head. The height of the ball head can be adjusted by using longer or shorter versions of this bolt. We used a bench drill to make a 3/8" and a 1/4" hole in the electrical plate as shown in this picture. The 3/8" hole will be used for the ball-head. The 1/4" hole is reserved for future use, possible for equipment mounting with a wing-nut.
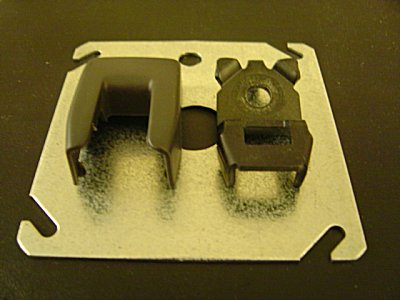
The above picture shows the child safety seat bracket. We will not reuse these parts for this project, but they will be saved in case we want to restore the vehicle back to its original condition. Perhaps, I will have a kid in the future.
Assembling the car camera mount is simple. First we use two 14mm wrenches to tie the 3/8"-16 bolt and nut to the metal plate. Then we arrange the two larger washers on both side of the plate, sandwiching the smaller washer. The smaller washer is in place to restrict the metal from moving too much relative to the child safety mount bolt.
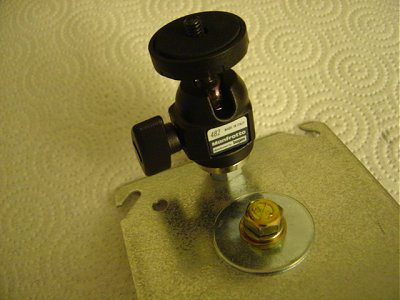
Once the washers are all in place, we re-assemble the child safety bolt set together with the three washers in between. Next, we screwed the ball head onto the 3/8" bolt securely. Now, the car camera mount is ready to be mounted to the vehicle.
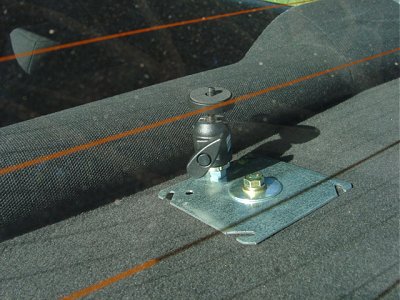
As shown in the first picture of this article, there is not enough room to attach the car camera mount to one of the side locations. But the center mount location is roomy and perfect for our installation. Using a 13mm socket and wrench, we torque the bolt down to the chassis. Viola! Our car camera mount is complete.
|
Published!
This article has been refined, clarified, and published with greater detail in the Hacking Digital Cameras book. Hacking Digital Cameras is published by Wiley under the ExtremeTech series of books. With ExtremeTech books |

|
At this point, I am considering painting the metal plate to match the interior of the vehicle. The silver metal plate reflects the sunlight into the rear windshield glass. It is just a minor nuisance. But I am also debating whether painting it black would cause it to absorb heat from the sunlight, which is another nuisance.
Note: These instructions presented here are for my own use during off-public-road track events. Car and camera manufacturers did not recommend these instructions. These instructions are also not approved by the U.S. Department of Transportation (DOT) or other local authorities. Use these instructions at your own risk.
Related Links
- Bogen Car Window Pod - Amazon User Reviews
- Bogen-Manfrotto Micro Ball Head #482 - Amazon User Reviews
- Bushnell 78-4405 Car Window Mount - Amazon User Reviews
- Constructing A Car Camera Mount
- Custom In-Car Video Camera Mount
- In Car Video Camera Mount
- Nikon Car Window Mount - Black Finish - Amazon User Reviews
- Pro-Optic Car Window Mount with a 3-way Pan-Tilt, Quick Release Tripod Head. - Amazon User Reviews
- Sturdy Mount + Detailed Instructions

Fun for Photographers
Get Our

Memecoins!
$10000-above
$5000-$9999
$2000-$4999
$1000-$1999
$500-$999
$200-$499
$100-$199
$50-$99
$25-$49
$0-$24
Gift Certificate

Audio / Video Electronics for Car & Home 
Get $20 off your first Crutchfield order of $200 or more. Referral code: p2e1e-h48g1-iqcct |