Super Digital Media Terminal
This project is about a Digital Photo Frame, right? Sure, a digital photo frame is one of the tasks it could accomplish, but this project is so much more.
If you can describe the project in a few words, what would it be? That would be the title of this article, but obviously you are looking for a few more words: contemporary, artistic, interaction, photo, video, audio, games, Internet.
The Rise of the Digital Photo Frames
A few years ago, people started taking their laptop computers apart and turning them into digital photo frames. That started the digital photo frame trend. Back then, the only spare notebook I had is my Sony PCG-505TS SuperSlim Notebook. But it was just too precious to hack. At the time, the 505TS had just become obsolete. Every new piece of software ran just a tad too slow on it. But being only about 3/4" thick (with the lid closed), it's the thinnest notebook around. It is just too awesome to be used for a single-minded task, like displaying photographs. With its magnesium silver finish, it became a conversation piece whenever people saw it. It really belongs in a cool gadget museum.
What about today? Today, I can easily buy a digital photo frame from the store. There are tons of them on the market. Even people who know nothing about technology have them in their homes. There is no point to building digital photo frames anymore.
The digital photo frames are also boring. They are designed to be like a regular photo frame. So people may never even notice them next to regular frames. That's great if I want to replace all my photo frames with digital ones and not have any of them stand out. But if I'm going to spend days hacking one together, I want someone to notice; I don't want to build it like a regular photo frame.
Is the SuperSlim notebook obsolete enough to hack? Not for me. It is still a precious gem that I'm not willing to take apart. I've installed Ubuntu (a Linux operating system) on it and have been able to use it for less taxing tasks, such as reading an e-book. But have no fear, I do have an awesome hacking idea (which I performed yesterday) for this classic museum-quality conversation piece.
The Idea
Ever since I was a small kid, I've been a science fiction fan. I love the idea of electronic homes, where there are TV terminals built into the walls in every room. These terminals could show-case my portfolio-quality photographs, or my award-winning short films. And that's what they'll do 90% of the time during their 24/7 operation. But I want more; I want the terminals to be interactive. I should be able to walk up to it and interact with it, whether it is to pull up today's weather, to find my grandma's favorite receipt, to control my home, or to play a game.
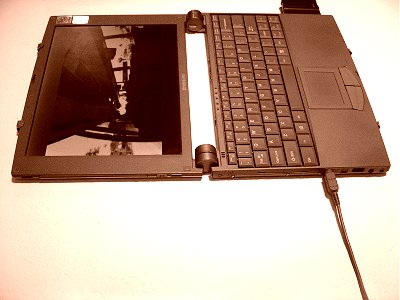
You start to see where I'm going? That's where the Sony PCG-505TS comes in the picture. The Sony PCG-505TS SuperSlim Notebook has an unique characteristic not found on most notebooks. This characteristic is critical to this project. This notebook is able to open completely 180 degree and lie completely flat. The screen is flush to the keyboard. No bulky keyboard base with a slim LCD.
I'm going to unfold this notebook completely and mount it in our dining room wall. It's going to be like no other digital photo frame anyone has ever seen before. It will be like the LCD terminals that you see in SciFi movies. It will display digital photos and digital videos 90% of the time. Users can interact with the slide show. The active matrix display will act as a nightlight, for safe passage to the kitchen. When my wife needs a receipt, she can walk up to it and pull it up. The terminal could let me play MP3's, let me play games, and let me control my home. I can use it to view the remote webcam that is located in the baby's room. And when the baby looks cute in the crib, I can shoot some webcam photos!
The mounted SuperSlim notebook is going to be like a contemporary interactive artwork. As soon as my guests see it, they are going to remember the SciFi movies they've watched. But it's a modern classic computer. It's also slightly old, but classic, reminding my guests that it's on exhibit. It's going to look like it belongs on my wall. At the minimum, it's going to be a really interesting conversation piece.
And I'm going to show you how I did it, so that you can do it, too!
Parts You Need
When I took the Sony PCG-505TS SuperSlim Notebook out to Home Depot to get the mounting parts, the first thing that the cashier said was "That is a really cute computer." That's when I patted myself in the back for this brilliant idea; my wife will surely love to have this classic computer hanging on the dining room wall. The following are the parts you'll need. You can pick them up at your local hardware store, like Home Depot or Lowes.
- Sony PCG-505TS or PCG-505TX SuperSlim Notebook
- Proxim RangeLAN-DS 802.11b Wireless LAN PC Card
- 3/8" Felt Lined Mirror Clips - 4
- 5/16" Felt Lined Mirror Clip - 1
- Flat-Head Screws
- 3M Small Wire Hooks with Command Strips
- Parts from the "Hanging Your Photo Frame" article
I have a PCG-505TS notebook. My childhood friend has a PCG-505TX. The physical form-factor is basically the same. You can use either. Of course, you can also use other notebooks, but you'll have to figure out your own parts list.
You'll probably want to use a wireless network card. The notebook is going to be on the wall. Unless you have some artistic ideas for the wire arrangement, it's best to go with as few wires as possible. The Proxim RangeLAN-DS 802.11b Wireless LAN PC Card works with Linux, so that's what I used for this project. You can pick any wireless network card that works with the operating system you are going to use.
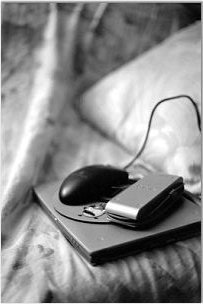
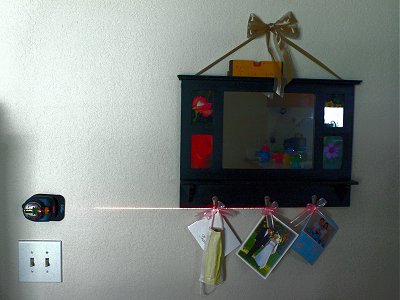
I used the 3/8" Felt Lined Mirror Clips. They are like J-hooks to help secure the notebook (see the clip on the left in the photo below). And these clips hide the screws, so that you won't see them on your wall. You can use other mirror clips to your liking. And if you use thicker notebooks, then you'll definitely have to use different mirror clips.
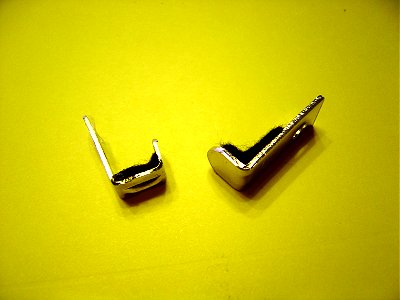
The 5/16" Felt Lined Mirror Clip is L-shaped clip (see the clip on the right in the photo above). I use it to set a stopping point for the notebook, so that when I slide the notebook into the J-clips, it comes to a stop at the same place every time.
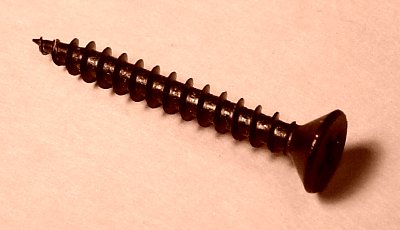
The flat-head screw is for fastening the mirror clips to the wall so that the head is flush against the face of the clip. I don't know the specification of the screws I used, because they are just left-over parts in my parts bin. The following is a photo of the flat-head screw I used.
The 3M Small Wire Hook is used for power cable routing. I didn't see anything better at Home Depot. But if you know a good substitute, feel free to use it and let us know about it. The thing I like about these 3M hooks is that they come with 3M Command Strips. These are permanent adhesive tapes that hold to the wall strong but come off when you want them to, without peeling off the paint.
Tools You Need
- Pencil
- Pliers
- Ryobi AIRgrip Laser Level ELL0001
- Tools from the "Hanging Your Photo Frame" article
You'll need a pencil to mark the location of the notebook for mounting. The pliers are for tweaking the mirror clips, if necessary.
If you want to line up your notebook with some other design elements on your wall, you'll need the laser level. Any laser level will do, but I like the Ryobi AIRgrip Laser Level that my brother given me. It has an electronic suction cup at its base and can suck onto virtually any wall with the included foam pad. For this project, the AIRgrip stayed on my wall for over an hour.
Mounting the Notebook to the Wall
Decide where you are going to mount the notebook to the wall. It's not always an easy decision. One important aspect is where is your power outlet (see "Routing the Power Cable" below).
After choosing the desired location, press the notebook firmly to the wall as you make an outline with a pencil. In my case, I wanted to mount the notebook next to the decorative mirror and hanger in our dining room, so a laser level is a must (see photo below). I used the laser level to align the bottom of the notebook to the bottom of the decorative mirror. I have already checked that the notebook is about the same height.
After drawing the outline, you can put away the notebook. Take the mirror clips and figure out how to arrange them around the notebook outline. I used two J-clips on the top and two J-clips on the bottom. I had to bend the shape of the bottom two J-clips a little bit to conform to the notebook. Mark the J-clips locations and the drill point.
Then drill and anchor the mirror clips using the same method as shown in the "Hanging Your Photo Frame" article. Except you should not use the same screws that are used in that article, you are going to use the flat-head screws mentioned in this article. The flat-head screw heads will be flush to the mirror clip. It allows you to slide the notebook over them.
After mounting the five mirror clips onto the wall, carefully slide the notebook into place. See if all the clips are aligned correctly and make any necessary adjustments.
Routing the Power Cable
Hopefully, when you picked a location for your laptop, you picked a location with a power outlet near buy. But even if the outlet isn't close, you can always run extension cords.
There is a power outlet on the same wall as my notebook. So when I mounted it, I had thought that I would simply make an artistic design on the face of the wall with the notebook power cord. However, when I tried to implement that idea, I found that the wall is already crowded enough with the notebook and the decorative mirror. If I had really wanted to use the power cord as a design element, it'd have to be a large blank wall with only the notebook terminal on it.
Therefore, I routed the power cable straight left, out the left side of the wall, into the seam between the wall and the fish tank. No one would pay attention to that small space. I attached a 3M Small Wire Hooks with Command Strips to route the cable. After this detour, the power adapter cable wasn't long enough to reach the outlet on the same wall face. So, I routed it to the other side of the wall, to a power strip that is sitting behind as easy chair. The easy chair concealed the bulky power adapter and the power strip, prefect for a clean look.
Powering It Up
Before I mounted the notebook, I already had Ubuntu installed on it. I had verified that it boots. You should also install the operating system you want to use for this Super Digital Media Terminal before you mount the notebook. I like Linux, because I can remotely log in to configure and execute whatever I wanted. Nowadays, you can do the same on Windows with Remote Desktop.
Try powering up your notebook to make sure it's getting power. If your notebook powers up on the desk, then it should power up just fine on the wall. The photo below shows my notebook booted up, displaying a slide show.
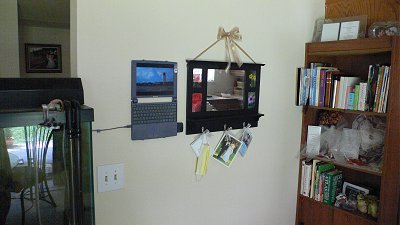
This concludes the article. In the future, I will show you how to set the Super Digital Media Terminal as a photo viewer, video player, MP3 player, etc. Currently, mine is displaying a slide show of our honeymoon in Hawaii. My wife is extremely pleased with it. Before I put the honeymoon photos on there, I surprised my wife by showing a cute graphic character. I am looking forward putting my photography portfolio on it as well.
Related Links
- The 25 Greatest PCs of All Time
- 3M 17067-VPVALUE PACK WIRE HOOKS pack of 4 - Amazon User Reviews
- Building a WallTop. ..or How to make use of that old laptop! ..or How to put a laptop inside a regular frame and hang it on the wall!!
- Cheap 'n Easy Digital Picture Frame
- DIY: Digital Picture Frame
- Duo Digital Frame
- Ryobi AirGrip Laser Level - Factory Reconditioned - Amazon User Reviews
- Sony VAIO Superslim
173 Users Online
|
Get Our
$10000-above $5000-$9999 $2000-$4999 $1000-$1999 $500-$999 $200-$499 $100-$199 $50-$99 $25-$49 $0-$24 Gift Certificate 
|
|