Some thoughts on the Sony DCR-TRV350 Digital8 Handycam
More than a decade ago, I had a Sony CCD-V9 Handycam Pro. It was one of the very first 8mm camcorder for consumers on the market. It failed about 10 years ago, after I left it in the closet at home when I left for college. While gathering dust, non-usage seemed to cause the grease to harden, which indirectly caused the mechanical cassette carrier to malfunction--it stopped playing and recording 8mm tapes. I was left with a handful of childhood memories recorded on 8mm tapes that I could not playback for quite some times.
The 8mm format, coined as Video8 by Sony, was once a magnificent king sitting on the throne of home camcorders. But with new generation of DV media--MiniDV, MiniMV, DVD, flash memory--flooding the market, the 8mm tapes are slowly becoming a dying breed. As I was quite afraid that my collection of memories would die with it, I decided that I needed to transfer my collection to a digital video format on my computer. My background is in Computer Science, so once the memories are transferred over to a computer, I will be able to do any future conversion easily through automation. The tough part is getting the data (video on the tapes) into my computer.
I decided to go with a Sony Digital8 Handycam. Digital8 uses pretty much the same compression/decompression algorithms (codecs) as DV, but it uses the original 8mm tape form factor and can record digital videos on Digital8, Hi8, or the original Video8 tapes. Like all MiniDV camcorders on the market, the Sony Digital8 camcorders can connect to the computer via the i.Link (Firewire, IEEE 1394, DV) port. Some also provide USB port streaming capability. My goal is to transfer all videos (past, present, and future) onto my computer. I will never store videos (and data) on tapes or physical hardware that obsoletes over time. Stored as computer files, these data can be transferred easily from one medium to another.
At first, I have gotten a Sony DCR-TRV130 Digital8 Handycam. I was quite impressed with its capabilities until I realized that it does not play-back the original Video8 and the newer Hi8 format. It would only playback Digital8 videos. Needless to say, I was quite disappointed and returned it. Soon, I found the Sony DCR-TRV350 Digital8 Handycam, which can playback Video8, Hi8, and Digital8 signals. After using it for only one night, I was so impressed with the features of this camcorder, I decided to write this article. As with my other articles, I will not dig into the basic functions of a camcorder (such as play and record), as most readers are already aware of them. Instead, I will concentrate on its impressive features and bad traits. I will also mention subtle observations that do not show up on the spec sheets, but supports the essence of the camcorder. So, here we go with my raves and gripes.
Appearance
I always start my raves and gripes with appearance, because that's what I experience first when I get the equipment out of the box. The camcorder and the accessory are packed extremely well, as with the packaging of all of my other Sony toys. Nothing pleases me more than a well packaged product to show me that the company respects its own invention. The product, itself, have to match in quality, of course. And it does in this case.
Although the camcorder weighs only one pound and thirteen ounces, it felt quite solid and sturdy. Compared to my Sony CCD-V9, this camcorder is quite light and very small. But it feels much bigger compared to most of today's tiny MiniDV camcorders.
Supplied Accessories
The package includes the following items:
- 19 button wireless remote RMT-814
- AC-L15A/L15B AC Adapter and Power Cord
- NP-FM30 Rechargeable Battery Pack
- 2 AA batteries for remote
- A/V connecting cable
- Shoulder strap
- Lens cap
- USB cable
- CD-ROM (SPVD-010 USB Driver)
The Sony DCR-TRV351 Digital8 Handycam also includes an 8MB Memory Stick. Otherwise, it is exactly the same as the DCR-TRV350.
Battery
Unlike my CCD-V9, or other camcorder and digital cameras that I have seen before, the AC adapter that came with the DCR-TRV camcorder does not have a built-in battery charger. Instead, the battery is charged on the camcorder itself. This makes shooting while charging a second battery impossible. The battery is quite small. When attached the camcorder, it is not intrusive to the operation of the camcorder. The following tables show approximate minutes at 25 degree C (77 degree F):
Charging time
| Battery pack | |
| NP-FM30 (supplied) | |
| NP-FM50 | |
| NP-FM70 | |
| NP-QM71 / NP-QM71D | |
| NP-FM90 | |
| NP-FM91 / NP-QM91 / NP-QM91D |
Recording time
| Battery pack | ||||
| NP-FM30 (supplied) | ||||
| NP-FM50 | ||||
| NP-FM70 | ||||
| NP-QM71 / QM71D | ||||
| NP-FM90 | ||||
| NP-FM91 / QM91 / QM91D | ||||
Playing time
This table shows the playing time for tapes recorded in the Digital8 system. The playing time of tapes recorded in the Hi8/Video8 system is reduced by about 20%.
| Battery pack | ||
| NP-FM30 (supplied) | ||
| NP-FM50 | ||
| NP-FM70 | ||
| NP-QM71 / QM71D | ||
| NP-FM90 | ||
| NP-FM91 / QM91 / QM91D |
Shooting in Pure Darkness
One of the features that impressed me the most about this camcorder is the ability to shoot in total darkness. That right, 0 lux. In fact, Sony built 5 modes into this Handycam to aid shooting in the dark.
These features proved most rewarding to me, because I have a hamster (Gibbie) as part of my household. Being a nocturne creature, Gibbie generally wakes up at night and runs around after I turn off all the lights. Like me, he likes discreet operations. Therefore, he is rarely active when the light is on. With the 0 lux recording capability, I was able to capture Gibbie in action.
NightShot Light
The NightShot Light is enabled and disabled through the menu system. When enabled, it turns on and off with the NightShot switch (see next section). When on, it emits an infrared light-wave forward, lighting up the environment for the Handycam to record. The infrared light is invisible to our naked eyes; therefore, the scene is covered in darkness, providing a discreet shooting opportunity. Using this feature, one can shoot in 0 lux!
NightShot
The NightShot switch on the side of the camcorder, seems to move an infrared-blocking filter out of the lens/sensor path, and allows you to capture infrared light-wave in the scene. Combined with the NightShot Light (see previous section), this feature provides a very powerful night scope capability.
I have found that the NightShot Light can be turned "on" and "off" in the menu system. I was confused at first because I would enable and disable it through the menus, but see no difference in the scene. It turned out that this capability is tied to the mechanic NightShot switch. When the NightShot light is enabled in the menus, the infrared light turns on with the NightShot mechnical switch. Than I realized that when the NightShot Light is set to "off" in the menus, the light does not come on when NightShot is switched to "on". Therefore, allowing the camera to capture the existing infrared light-wave without polluting the scene with its own infrared light.
I find this feature quite exciting as I have thought of getting into infrared photography in the past. Thumb up to Sony on providing this flexibility.
Super NightShot
The Super NightShot function makes subjects up to 16 times brighter than those recorded in the NightShot mode. I have not yet tried this function, so I will write more after I try it.
Color Slow Shutter
The Color Slow Shutter function enables you to record color images in a dark place. I have not tried this feature yet either.
Built-In Light
This camcorder also comes with built-in light. The light can be configured to turn on automatically in the dark or manually. As with cameras, I like to shoot discreetly, so I will rarely use this light.
Minimum Illumination
The Sony camcorders have wonderful nighttime shooting capability. However, I do not understand the discrepancy in minimum illumination between its model line-ups. The minimum illumination is the minimum lighting required for the camcorder sensor to pick up a signal before assisted lighting is needed. The Sony Hi8 line-up (CCD-TRV118, CCD-TRV318, CCD-TRV418) all have minimum illumination shooting capability of 1 lux at f/1.6. The Sony Digital8 line-up (DCR-TRV150, DCR-TRV250, DCR-TRV350, DCR-TRV351) all have minimum illumination shooting capability of 4 lux at f/1.6. It would be nice to be able to shoot down to 1 lux with this camcorder.
Audio
Sony DCR-TRV350 supports two audio modes: 1) 16-bits (Fs 48 kHz, stereo); 2) 12-bits (Fs 32 kHz, stereo 1, stereo 2). I did not understand what this means at first. And the manual did not describe the difference between the two at all. I ended up searching the internet for some answers.
16-bits
The 16-bit mode uses an analog-to-digital (A/D) sampling frequency of 48 kHz (the same as DAT). Using this rate, the format has a frequency response of up to 24 kHz. In this mode, the recording contains only a single stereo channel. Therefore, if you dub over this in the camcorder, you will erase the original track.
12-bits
The 12-bit mode operates at a sampling rate of 32 kHz, which yields a frequency response of up to l6 kHz. To provide the same 96db offered by the 16-bit mode, the 12-bit mode employs dynamic audio compression during recording. During playback, the audio signal is appropriately expanded. In 12-bits mode, the recording contains two separate stereo tracks. The original recording sound is stored on the first track. You can dub over the second track and retain the original sound, such as narration or background music. During playback, you can play track 1, track 2, or inter-mix the two tracks at varying levels.
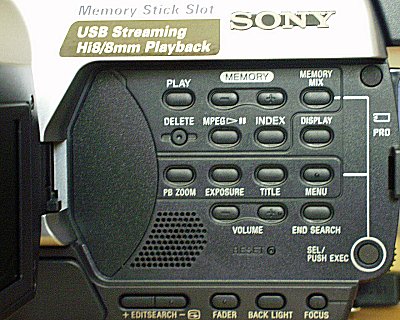
16:9 Wide
16:9 is the aspect ratio for a wide screen. The standard TV screen is 4:3, which most camcorders record to. The DCR-TRV350 allows recording of 16:9 aspect ratio by chopping off the top and bottom video capture. Although I am not a fan of losing data, it is a neat feature to try out different artistic composition.
Interval Recording
This is a very nice feature. In fact, I have wanted to purchase interval shutter releases for my still cameras. Interval recording allows you to make time-lapse recording by setting the record and standby sequence. Recording time and interval time can be set to any combination, providing maximum flexibility.
Frame by Frame Recording
When I was young, I had a friend with an interest in film and acting. He now has an acting degree. At the time, he had a "fancy" camcorder that could record video frame by frame. We started creating our own adventures using all the G.I. Joe figures that my brother and I collected. The Sony DCR-TRV350 also has this feature. Every time the "Start" button is pressed, the camcorder captures about 6 frames and returns to recording standby. I look forward to trying out this feature again.
Memory Stick
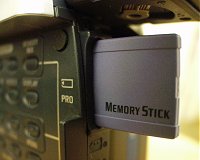
The Sony DCR-TRV350 has a Memory Stick slot. However, a Memory Stick is not supplied as a Digital8 tape is not supplied. The slot is compatible with the original Memory Stick and the newer Memory Stick PRO. Yes, 1GB Memory Stick Pro can be used with this camcorder! The beauty of this camcorder is that you can record both digital pictures and digital video/audio's on this camcorder.
Digital Still Pictures
This Handycam can also be used as a digital camera to take digital pictures. The picture can be acquired from the lens or from tape. The Handycam even has a dedicated shutter button for shooting pictures. Like a regular camera, the shutter button is a two-position switch. The first state focuses the lens, while the second state allows you to re-compose and shoot. The pictures are then stored on the Memory Stick in JPEG format. The number of pictures can be stored is only limited by the size of the Memory Stick. One downfall of this feature is that the image size is only 640x480. Most other DV camcorders now days support digital still pictures of around 1024x768 resolution.
| Image quality mode | Memory capacity |
| FINE | About 150 KB | STANDARD | About 60 KB |
| Memory Stick Size | ||
| 8MB | ||
| 16MB | ||
| 32MB | ||
| 64MB | ||
| 128MB | ||
| 256MB | ||
| 512MB | ||
| 1GB | ||
Digital Video/Audio
This feature impressed me the most. The DCR-TRV350 can record video directly on the Memory Stick. The length of the video is only limited by the size of the Memory Stick. The video and sound is stored as MPEG1 format. However, the video size is limited to 320x240 or 160x112. The sound is recorded in monaural. The date/time portion of the date code is also recorded.
| Memory Stick Size | ||
| 8MB | ||
| 16MB | ||
| 32MB | ||
| 64MB | ||
| 128MB | ||
| 256MB | ||
| 512MB | ||
| 1GB | ||
Tape to Memory Stick
As an added feature, the video and sound on the tape can be directly transferred to the Memory Stick on this camcorder. Although the sound is reduced from 12-bit or 16-bit stereo to monaural, not having to plug the camcorder into a computer is a plus.
Input/Output Connection
The Sony DCR-TRV350 supported many more input and output jacks than I have ever seen before on a camcorder. This camcorder has the flexibility of being used for a long time to come.
S-Video
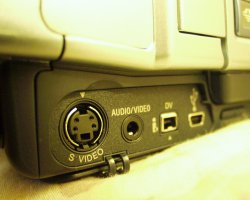
This is a standard 4-pin mini DIN that supports both input and output!
Audio/Video
This is a 3.5mm stereo minijack. However, this is not a standard stereo jack, because it supported one additional video signal. The pin-out for this cable will be in another article.
Microphone
This is a standard 3.5mm stereo minijack.
i.Link (Firewire, IEEE1394, DV)
I have not had a chance to try this feature yet. I have a i.Link port on my Sony PCG-505TS notebook. It is running Windows 98. When I plug it in, the computer recognizes the Handycam as a Sony DVCR. But I could not get the ImageMixer software to recognize that a camcorder is plugged in.
If you know of a newer driver that I could use or how to get this Handycam to work with my notebook, please let me know.
I imagine the movie quality, sound quality, and resolution would be higher though this interface than the USB interface since Firewire has a higher bandwidth.
[Update 2003-10-29] I went out last week and bought a Belkin FireWire Notebook Adapter. It is a CardBus adapter with three 6-pin FireWire ports. The camcorder worked just fine with this adapter and my Averatec notebook. I was able to capture video and control the camcorder through Windows Movie Maker on Windows XP. Set-up was a piece of cake; the software detected everything automatically. The higher throughput allowed the transfer of video in DV format at a resolution of 720x480. Be warned, each minute of video takes up 180 MB of storage space! This means that a 700 MB CD-R can store 3.8 minutes, a 2 GB DVD-R can store 11.1 minutes, and a 4 GB DVD+-R can store 22.2 minutes of DV data.
USB
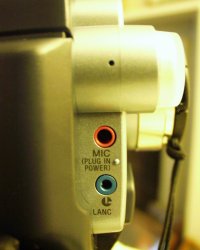
The USB jack is based on the mini-B standard. It is the same as the connector on my Sony Clie. In fact, I used the same cable. Connected the camcorder through the USB port and using the included InterMix software, I was able to capture video at a maximum of 320x240 resolution. There was no sound; I got nervous. I wanted to transfer sounds contained in my child-hood memory. After looking around a bit and at the Sony's product support site, I found out that the sound source has to be configured through the preference menu in InterMixer software to use the USB port. Whew . . . this camcorder is a keeper.
LANC
This is a rare, but standard, 2.5mm stereo minijack. I have no idea what is the purpose of this jack. If you do know what it is for, please let me know. [New Updated: See the discussion for this article.]
Pass-Through Signal Convert
The DCR-TRV350 has the built-in pass-through, analog signal converter function. This function allows you to convert analog video signals, such as from a VCR or a camcorder, to digital signals on a computer or other equipment. This function bypasses the need to record to a DV tape first than transfer to the end result. Many DV camcorders do not include this feature.
To use this functionality, plug in your analog video signals to the DCR-TRV350's S-Video or A/V in port. Then plug the i.Link or USB cable to your output device. Finally, enable the function in the menu.
LCD Viewfinder and LCD Screen
The viewfinder on the DCR-TRV350 is a monochrome LCD. The monochrome does not bother me, since my old CCD-V9 is also monochrome. And seeing things in monochrome sometimes stem artistic ideas in me. The gripe I have is that it is a LCD viewfinder rather than an optical viewfinder. An optical viewfinder will save electricity and battery life. Of course, optical viewfinder equipped camcorders probably do not exist, but I can still gripe about it.
The LCD screen is 2.5 inches in size and has a resolution of 560x220. The display is color and seems sharp and crisp. It could be rotated 180 degrees forward and 90 degrees back.
Tape Media
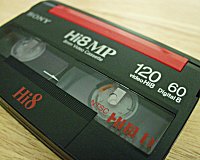
The following are some interesting tidbits on tape media that I found on the net.
"MiniDV uses Metal Evaporated tape (ME) - tape for home use - and while it is suitable for the demands of consumers, it is not robust or mature enough for the broadcast and professional use - and that's why broadcast tape formats use MP - Metal Particle tape. Panasonic tape is recommended as the most trouble free MiniDV tape that can be used in all MiniDV equipment because it completely complies with the manufacturers DV group specifications." - DV THE REAL STORY
"Sony's new format DIGITAL 8 uses the same tape as regular Hi8. You can choose to use the MP (Metal Particle) or ME (Metal Evaporative) Hi-8 tape. Because of the properties of ME, Sony suggests this is the better tape to use.... it is rather expensive. An alternative may be Fuji's ME Position (Titanium) tape. But you could even use regular 8mm tape in a pinch. But don't expect the same quality." - Tape Resources FAQ
Just a note: out of all the Video8, Hi8, and Digital8 tapes I have, they are all Metal Particle tapes. I have not seen a Metal Evaporated tape in person, but I noticed that they are available for purchase on-line.
Related Links
- Anatomy of a Mini DV Tape
- Answers here for 8mm video capture
- D8 FAQ
- Digital8 Camcorder: Easy Transition to DV
- Digital8 vs MiniDV
- Digital8 Yahoo! Groups
- Digital Definitions: The Best 6mm Digital Format Depends on Your Priorities
- DV Tape FAQ
- DV THE REAL STORY
- DV versus Digital8 versus S-Video
- How Camcorders Work
- Making Moves: Shooting in the Dark
- Rechargable LIthium Ion Batteries
- Resolution test of SONY camcorders
- Sony DCR-TRV350 Digital8 Handycam - Amazon User Reviews
- Sony DCR-TRV350 Specification
- Sony Digital8 Handycam Camcorder: FAQs
- Sony Digital8 Handycam Camcorders: Manuals
- Digital8 Handycam Camcorders: Software Updates
- Tape Resources FAQ
- The Video Formats 3: Mini DV and Digital8
$10000-above
$5000-$9999
$2000-$4999
$1000-$1999
$500-$999
$200-$499
$100-$199
$50-$99
$25-$49
$0-$24
Gift Certificate

