

![]() Attach
|
Attach
|
![]() Edit
|
Edit
|
![]() Revisions
Revisions
![]() Related Content
Related Content
Setting Up a Remote Web Cam
My wife and I just had a newborn. Traditionally, the Chinese newborn mothers get a full month of rest. They do nothing, except eat, feed the baby, sleep, and minor exercise when they feel up to it. They start on a low-sodium, low-sugar, and low-spice diet. This practice eliminates stress and helps The mother recover quickly. In Asian countries, it is relatively easy to find an "expert" to help at home. In the U.S., finding that Kind of help is virtually impossible.
On the other hand, there are many home nursing centers in large, Asian-populated U.S. cities. These nursing centers have one or more after birth "experts" to take care of the mother and the newborn. They will cook for the mother, change diapers, do laundry, and bring the baby to the mother for feedings. Most, if not all, of these nursing centers have WiFi access for the guests.
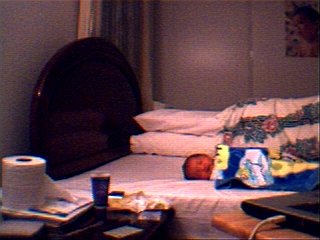
My wife checked into one of these nursing homes soon after giving birth. I, on the other hand, have to catch up on chores at home and at work. Nevertheless, I wanted to be with our baby and my wife all the time. Plus, my wife would feel better if I check in on her often. So I decided to set up a remote web cam for me to see them while I am away (see photo below).
Purpose
In this article, I will explain how to set up a remote web cam on a Windows XP computer with a basic web cam. The same procedure works for a desktop or a notebook computer. I choose a basic web cam over a stand-alone network web cam because 1) I already have one; and 2) I don't have administration access to the remote router to allow outside viewing of the remote web cam.
It you are familiar with Linux, you can substitute a Linux computer. I chose Windows XP because that is what my wife is running on her notebook computer; I didn't want to set up another computer in her room.
Concept
The idea is to have the remote web cam computer capture and transmit images over the WiFi link to a web server. The remote web cam computer can't serve the image itself because it is behind a firewall/router that you don't have permission to re-configure.
The web server can be one you set up at home or at a web hosting service. You may already have one that can be used for this purpose. Setting up a web server or a web hosting service is beyond the scope of this article.
Imaging Device
You can use any imaging device that your operating system recognizes. I've use the IBM PC Camera (USB web cam), the Sony DCR-TRV350 Handycam (Firewire), and the Playstation 2 Eye Toy; they all work. See these articles to set-up these devices:
- Connecting Your Digital Camcorder to Your Computer
- How to get the IBM PC Camera to work with Windows XP
- Using the Sony EyeToy as a USB WebCam on your PC
Software
Fwink is a free, open source web cam software for Microsoft Windows 98, ME, 2000, and XP. I choose this software because my wife's computer runs windows XP. It being free, open source, and small are also big pluses. It also serves my need because it can transfer images over the network to my web server. You can get a copy of Fwink from "Related links" below.
Its only shortcome is that it only supports the FTP for network transfer. It's less secure than some other transfer portocols. I can live with this insecurity for a month. Most web hosting services support FTP uploads, so you probably already have access to FTP. If not, you can set-up a FTP daemon on your own Linux web server quite easily. Check out the "Installing Telnet Daemon on Ubuntu" and "Installing FTP Daemon on Ubuntu" articles in "Related Links" below for more details.
So far, Fwink and Windows XP has ran continuously for about a week or so without crashing.
Download Fwink
As of this writing, Fwink is at version 0.9.95. There are three different distributions for Windows:
- Windows 98 or ME
- Windows 2000
- Windows XP or Vista
You'll have to download the one for the Windows you are running. After downloading the software, installation is as easy as double-clicking on the executable and clicking "Next >" a few times.
Set Up Fwink
After installing Fwink, run it from the "Start" menu. You might not see anything at first. You'll need to configure it. Click on "Settings..." to configure Fwink.
The first configuration page you'll see is the "File Transfer" page (see photo below). Enter the FTP information in the field provided. If you have a web hosting service, you can get the FTP information from your host provider. You can also disable FTP if you don't want to send the image remotely. In that case, you'd probably want to enable "Save images to a file".
I kept my capture interval at 1 minute; you can change it to as often as you like. Just keep your network bandwidth and traffic in mind.
After configuring the "File Transfer" page, click on the "Video Capture" tab. You'll end up at the "Video Capture" settings page (see photo below).
If you only have one video capturing device attached, then that's the default video device. If you have multiple imaging devices, you can click the "Change Device..." button to pick the one you want to use. But if no devices show up, then it means you haven't installed a video capturing device. In that case, to back to installing the video device before continuing.
You can also change the standard size for your images. Just keep in mind that the larger the image, the longer it take to transfer over the network. You will also eat up a lot more bandwidth, depending on your capturing interval.
When you are done with the settings, click "Apply" and then "OK". You'll need to restart Fwink for some settings to become effective.
Set Up the Web Page
Once Fwink is running, and is successfully uploading images to the web server, it's time to build a web page to display the image and automatically refresh. To teach you how to write web pages would take a whole book and is out of the scope for this article. So in this article, I will present a simple web page that only displays the image and includes the code to automatically refresh. You can customize it to your liking. The following is a simple "index.html" file for you to place in your web cam image directory.
<html>
  <head>
    <title>WebCam</title>
    <META HTTP-EQUIV="REFRESH" CONTENT="60; URL=index.html">
  </head>
  <body bgcolor="black" text="white" link="yellow" vlink="red">
    <center>
      <h1>WebCam</h1>
      <img src="webcam.jpg" width="640" height="480">
    </center>
  </body>
</html>
The web page above refresh the browser every minute (60 seconds). You can change that value by changing the "META" line. You can also change the color scheme anyway you like. To change the size of the image shown on the web page, change the width and height settings.
View the Web Cam
To view the web cam, simply direct any web browser to the web page. The URL depends on the domain name, or IP address, of your server and the directory you put the web page in. If you have a web hosting service, their tech support can help you figure out how to see your web page.
Archive Sequencial Images
Fwink doesn't allow you to save the images by time. You can only give it one name. But since I send the image over the a Linux server and it's really easy to write UNIX shell scripts, I decided to write my own software that archives the sequence of images. I am distributing the software under GPL, so you can use them for your own purposes. Please see the following two web pages on the software and how to run it on your own computer.
Instead of the Baby Monitor . . .
After coming home, I decided to continuing using this web cam system as our baby monitor. I wired up the IBM PC Camera to the crib's toy hanging bar, pointing down at the baby.

At night time, the IBM PC Camera is not sensitive enough to capture a visible image. But the Sony DCR-TRV350 Handycam works better. So I put that on an Ambico Video Tripod by the crib. I turned on NightShot mode (see "Effect of Infrared in Night Vision Photography" on this site). But turned off the NightShot light (infrared), as I have no idea what effects infrared light have on a baby (see "Wildlife and the Electromagnetic Spectrum" on this site).
The computer now sends the photos via FTP to my Linux server via the local area network, so bandwidth is no longer an issue. I set the capture interval to 30 seconds, 15 seconds, or even 5 seconds. I've also increased the web page refresh rate. Finally, I closed off the FTP port forwarding at the router because it is no longer needed.
With a notebook placed by the TV in the living room, my wife and I can now watch TV, while our baby sleeps in the crib in our bedroom.
Related Links
![]() Attach
|
Attach
|
![]() Edit
|
Edit
|
![]() Revisions
Revisions
![]() Related Content
Related Content
Attachments
- Fwink Settings - File Transfer.gif (13 KB)
- Fwink Settings - Video Capture.gif (17 KB)
- Personal Info.txt (906 B)
- Web Cam.jpg (18 KB)
- WebCam on the Toy Bar.JPG (23 KB)
- thumbnail.jpg (3 KB)
349 Users Online
|
Get Our
$10000-above $5000-$9999 $2000-$4999 $1000-$1999 $500-$999 $200-$499 $100-$199 $50-$99 $25-$49 $0-$24 Gift Certificate 
|
|


