

Converting N3 Accessories to E3
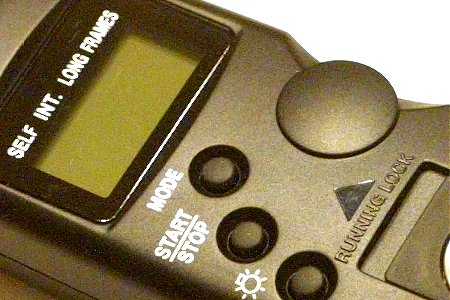
Throughout the years, Canon has designed three different accessory plug standards--E3, N3, and T3--on its EOS line of SLR cameras. Only the E3 plugs are readily available at your local electronics store (like RadioShack). The other two types of plugs are Canon proprietary standards. Not all accessories are available in all three standards. For example, the awesome Canon TC-80N3 Timer Remote Control (face shown in the photo below) is only available with the N3 plug.
Canon does make a few adapters to go from one standard to another, such as the E3 to T3 and the T3 to N3 adapter (see "Easiest way to use your E3 accessories with N3 cameras" elsewhere on this site). However, there are no adapters to go the other way around. The only way is to make your own adapters or modify the accessories.
One extremely useful modification is to convert the Canon TC-80N3 Timer Remote Control to an E3 plug. This modification allows you to use the timer remote with a lower-end Canon EOS SLR camera, such as the Digital Rebel, which outsold its higher end siblings. This modification also allows you to easily extend your N3 accessories using inexpensive cables and adapters from RadioShack (see "How to extend the RS60-E3 remote switch?" elsewhere on this web-site); you won't need to shell out for the expensive ET-1000N3 Remote Extension Cord. In this article, I will show you how to convert any N3 accessory to an E3 accessory. And I will show you the procedure by modifying a Canon TC-80N3 Timer Remote Control.
Parts You Need
- N3 Accessory (such as the Canon TC-80N3)
- RadioShack 274-298 Stereo Right-Angle Submini Phone Plug
- RadioShack 274-274 In-Line 1/8" Phone Jack
- RadioShack 274-397 3/32" to 1/8" Adapter
Since you are reading this article, you probably already have a N3 accessory that you want to modify. It doesn't matter what N3 accessory you want to convert, the procedure to convert them are the same.
The Stereo Right-Angle Submini Phone Plug is the E3 plug. I picked the right-angle feature, because the E3 socket on the camera is generally on the side of the camera. The right-angle plug allows the wire to hang straight down from the side of the camera. It's looks less awkward, exerts less leverage on the socket, and won't get in the way of your hands as much.
The In-Line 1/8" Phone Jack and the 3/32" to 1/8" Adapter is for building the E3 to N3 Adapter. This adapter allows you to continue using your modified N3 accessory with your camera. However, it isn't necessary if you are not interested in doing so. I couldn't find an In-line 3/32" Phone Jack at my local RadioShack, so I used the 1/8" version with a 3/32" to 1/8" adapter. You can substitute both of these parts with an In-Line 3/32" Phone Jack, if you can find one.
Tools You Need
This project requires you to spice in the parts, mentioned earlier, into the cable of your N3 accessory. To do that, you'll need to cut the wire with a wire cutter and strip the internal wires with the wire stripper. I have a Irwine Vise-Grip Multi-tool that cuts, strips, and crimps. It is very handy. If you gotten this far in the article, then you are probably already have tools to help you with these tasks. But if not, I suggest you pick up the tool that I have. Do not use a pair of scissors to do electrical work.
Soldering iron and solder are required for this project. The soldering iron and solder help you attach the parts, mentioned earlier, to the N3 accessory cable. If you never used a soldering iron and solder before, I suggest you pick up a copy of my "Hacking Digital Cameras" book. It's got a very well-written chapter on picking and using soldering irons.
Step 1: Cutting and Stripping the Cable
The first step is to cut off the N3 plug on your N3 accessory. Don't cut it off right by the plug. The N3 plug is actually quite valuable, because you can't buy this plug cheaply. So it's worthwhile to leave a bit of cable lead at the end of this plug to build it into something else, say an E3 to N3 Adapter. I would cut the cable at about five inches from the N3 plug. That leaves enough cable for an adapter.
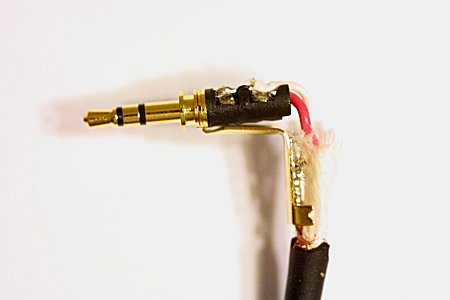
After cutting the cable, strip off 1-inch of the outer rubber cable insulation (10-guage). You will expose three electrical wires inside. One is white, one is red, and the other one is not insulated. Gather up all the un-insulated metal wires into a bundle and twist it into a wire as shown in the photo below. The red and white wire is wrapped in a paper sleeve. Cut the paper sleeve with an X-acto knife and strip it away.

Strip the insulators (22-guage) from the red and white wires. After metal wires are exposed, twist the metal wires into individual bundles like you did with the bare wire. Use the soldering iron and solder to tin the bare wires.
Step 2: Wiring the E3 Connector
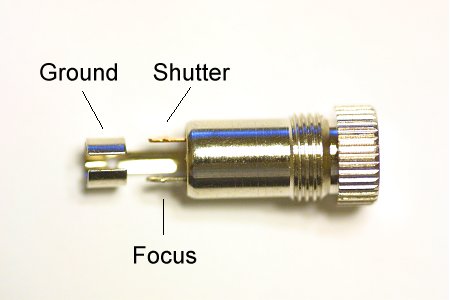
In this step, you will be working with the cable on the N3 accessory end (not the N3 plug end). The bare, un-insulated wire is the electrical ground. The white wire is the focus trigger. The red wire is the shutter trigger. You'll need to solder these wires to the Stereo Right-Angle Submini Phone Plug, which will serve as the E3 connector for your camera.
The tip of this connector is the shutter trigger. The next contact is the focus trigger. And the last contact on this connector is the ground. (See the "Canon RS60-E3 Remote Pin-Out" article elsewhere on this site.)
Before you start soldering and making contacts, note that the submini plug comes with a plastic enclosure and a rubber O-ring. The rubber O-ring fastens the plastic enclosure over the internal wires after you've soldered it. Make sure you fit the O-ring around the black cable insulation on the N3 accessory first, before soldering the plug. Otherwise, you'd have a hard time getting the O-ring around the connector.
You'll need to solder the white wire to the focus contact (shown in the photo below). Then solder the red wire to the shutter contact (see photo below). Finally, solder the un-insulated wire to the ground contact on the submini plug (identified in the photo below).

Once you have all the wires soldered, run the wires down the side of the ground contact (see photo below). Use the wire stripper to clamp the wire clip (at the end of the ground connector) around the wires. Then enclose the contact within the plastic enclosure that came with the submini plug. Slip the O-ring around the enclosure to lock it around the internal components.
After making this modification, your N3 accessory can only be used with your E3 camera. But if you proceed to make the E3 to N3 adapter below, you will be able to continue enjoying using your modified N3 accessory with your N3 camera.
Step 3: Making the E3 to N3 Adapter
If you don't care about using your modified N3 accessory with N3 cameras anymore, then you can skip this section all together. But it's quite handy to have an E3 to N3 adapter on hand. And this adapter is as easy to make as changing the connector on your N3 accessory in previous steps.
Before making the contact, unscrew the black plastic housing from the In-Line 1/8" Phone Jack. Then slide the black plastic housing onto the cable. You won't be able to attach this housing to the cable nor the jack after soldering the wires.
Next, as in step 1, strip the outer rubber insulation and the inner insulations from the N3 plug end of the cable. This time, you are going to solder these wires to the In-Line 1/8" Phone Jack. The photo below shows the contacts for the In-Line 1/8" Phone Jack.
Solder the red wire to the shutter contact on the jack. Solder the white wire to the focus contact on the jack. Finally, solder the un-insulated wire to the ground contact.
Arrange all three wires so that the run through the semi-circle ground contact. Make sure none of the bare wires are touching each other. Now, slide the black plastic housing over the jack and screw it on.
Because I couldn't find an In-Line 3/32" Phone Jack, a 3/32" to 1/8" adapter is necessary to convert the 1/8" jack into a 3/32" jack. Simply plug this adapter into the 1/8" jack and your adapter is ready to accept any E3 accessory.
Step 4: Final Check
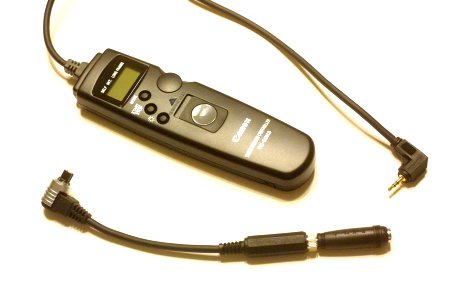
Once you have performed all of the steps about, you'd have an E3 accessory with an E3 to N3 adapter. The photo below shows a Canon TC-80N3 that's been converted with an E3 connector and an E3 to N3 adapter.
Plug your modified accessory into your camera and run through all of the functionalities of your accessory. If everything works as expected, then you've wired up everything correctly. If focus/shutter continues to trigger, without you pushing any buttons, then that means you've got a short circuit somewhere. If pushing the button half way triggers the shutter, while pushing the button all the way down causes focus, then you've switched two wires somewhere.
After modifying your N3 accessory successfully, you'll find that this hack is quite easy to perform. And you can perform this same hack for numerous cameras on the market. Good luck.
Related Links
- Building a Digital Intervalometer - A better intervalometer than the one built-in to Minolta Dimage.
- Canon ET-1000N3 Remote Extension Cord for Canon EOS SLR Cameras - Amazon User Reviews
- Canon TC80N3 Timer Remote Control for EOS D30, D60, D10, 1D, 1V & 20D SLR Cameras - Amazon User Reviews
- Hacking Digital Cameras (ExtremeTech) (Paperback) - Amazon User Reviews
- Irwin 2078309 Vise-Grip 8-Inch Multi-Tool - Amazon User Reviews
- RadioShack
112 Users Online
|
Get Our
$10000-above $5000-$9999 $2000-$4999 $1000-$1999 $500-$999 $200-$499 $100-$199 $50-$99 $25-$49 $0-$24 Gift Certificate 
|
|